Stay ahead of the game

Sign up for our newsletter to receive the latest digital marketing strategies and insights for the month ahead, delivered straight to your inbox!

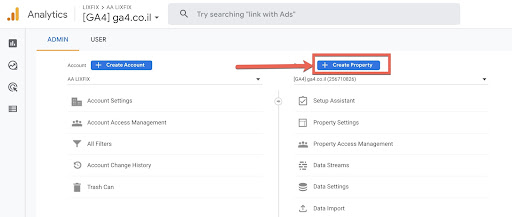
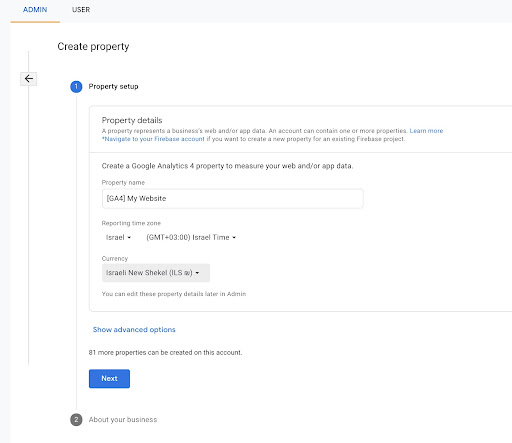
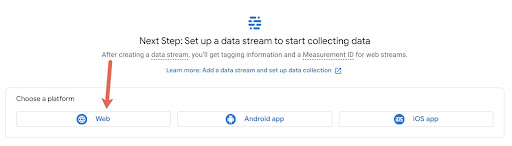
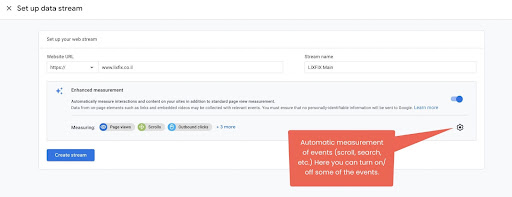
    Building a Google Analytics 4 funnel | Part Two

    Google AnalyticsMarketing Analytics

    In this series of guides, we will teach you how to build your own funnel in the new Google Analytics 4, step by step.

    In part one of the guide I explained the options you could find in the funnel report of Google Analytics 4, and I spoke about its advantages over the old Universal Analytics funnel.

    However, in order for this to work, the first thing that we obviously need is an Analytics account… 

    So, in this part of the guide, we’ll learn how to open our first account in Google Analytics 4, and how to implement it on our site by using Google tag manager.

    Even if you already have a Google Analytics 4 account, I suggest that you still go through this guide, because there’s a chance that you’ll learn some new things that you had not yet known.

    Step One – Opening an Account

    Go into your Analytics account and click on Create Property.

    In the following screen, you’ll be prompted to give the property a new name (I recommend entering GA4 at first so that it will be easier for you to find it and differentiate it from your old property) and to designate your location, time, and currency.

    After clicking Next, Google will ask you a few questions about your business (optional), and then you’ll get to this screen, where you’ll have to select Web.

    In Google Analytics 4 it’s possible to connect a number of properties (site / iOS apps / Android apps) into one property, but in our case, we’re going to connect the regular website:

    Now you’ll need to enter the website address and your Stream name. Note that it won’t be possible to change these entries later on.

    Likewise, you’ll be able to choose whether to use an automated measurement of events like scrolling, searching, clicking outside the website, watching videos, and downloading files.

    It’s important to note that this measurement is very basic (for instance, Google measures only about 90% of the scrolling on a given page, and not 25%, 50%, etc.), and if you want to implement the follow-up on your own, you’ll be able to turn off the events that you don’t want by clicking on the gear icon.

    Nice! We’ve finished opening our new Google Analytics 4 account.

    Step Two – Adding Tag Manager

    On the right side of the screen that you’ve now arrived to after creating your new Analytics account, you’ll see a number titled Measurement ID.

    Do you remember the number on the old Analytics that started in Universal Analytics? In Analytics 4 it begins with G.

    In my case, that number is G-JS7KRHFTXC.

    Copy the number by clicking the copy icon on the right: 

    Open tag manager and create a new tag.

    Click on the Tag Configuration tab, and then select Google Analytics: GA4 Configuration (I’ll later explain what the difference is between Configuration and GA4 Event):

    Now, paste the number that you copied earlier in the Measurement ID field, and select All Pages in the Triggering tab (this exists in all accounts as a default option, so you only need to select it).

    That’s all!

    You’ve finished creating the basic tag for Google Analytics 4.

    Now you have to select Publish in order to upload the changes you’ve executed, and, of course, to make sure that the tag manager is implemented on all of the site pages.

    What’s really going on here?

    Everything in Google Analytics 4 is measured via events.

    Here you’ll be able to see, for example, the list of events that are being sent to the Google account:

    Also, a report of everything that the user viewed on the page gets sent as an event titled Page_View, which will be sent every time that the user will go to a new page.

    This, of course, happens thanks to the tag that we’ve now designated, and if you pay attention closely – there’s a box in our tag that basically tells the tag manager to send a page view event together with this tag:

    I don’t want to get into any technical explanations now, but overall – the GA4 Configuration determines the designations, whereas the GA4 Event actually sends the event. 

    The configuration needs to be sent on all of the pages, whereas the event needs to be sent only when some event takes place. 

    Since the configuration gets sent in all of the pages anyway, Google allows us to check the ‘Send a page view event when this configuration loads’ checkbox and to send a page view event in the configuration tag as well, without having to open a new tag for this. 

      Get exclusive CMO tips that I only share with email subscribers.

      Conclusion

      In this part of the guide, I’ve shown you how to open a new Google Analytics 4 account, and how to implement the basic code via Google tag manager. 

      In the following segment, I’ll show you how to implement additional events, since they are really the foundation of the entire funnel. 

      Think about it – a funnel is really a succession of a number of events that are supposed to happen one after another, and we want to see how many people leave the site after each event without continuing on to the next event.

      In order to measure these events, we need to implement events, and we’ll learn about this in the next guide.

      Share this article
      Back to top