Stay ahead of the game

Sign up for our newsletter to receive the latest digital marketing strategies and insights for the month ahead, delivered straight to your inbox!

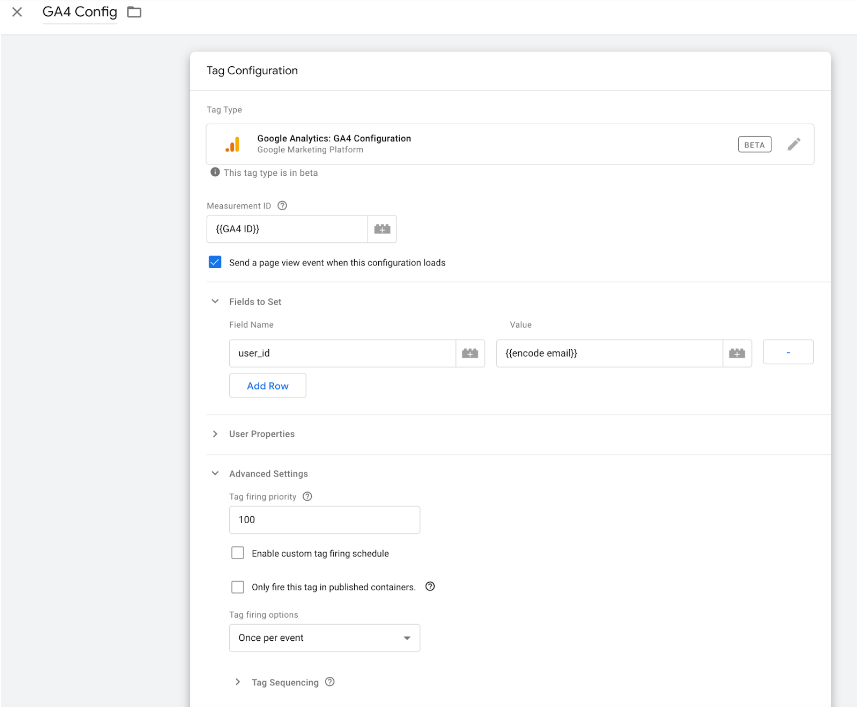
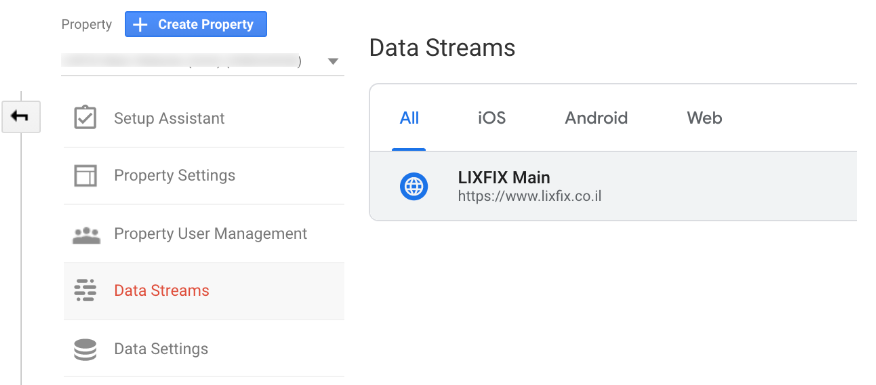
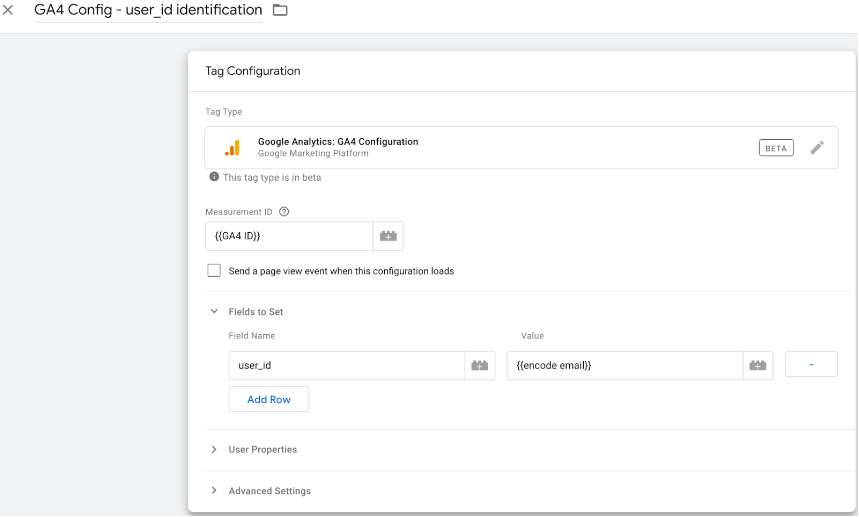
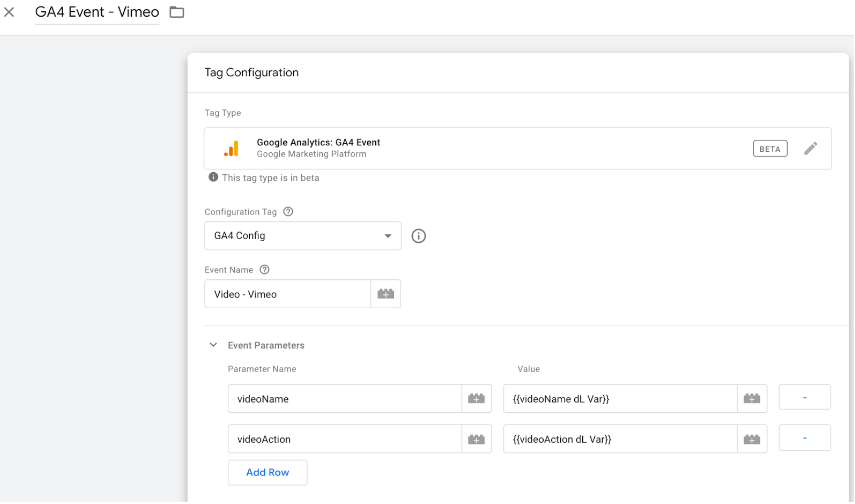
    How to Install GA 4 Using Tag Manager? [+Detailed Screenshots]

    Google AnalyticsMarketing AnalyticsPPCReporting and AnalyticsReporting Basics

    In the prior post, we explained the differences between Google Analytics 4 and the good old Universal Analytics we’ve been accustomed to.

    In this post, I’ll show you how to implement Google Analytics 4 using tag manager.

    The last thing I want is for you to copy what’s written in this guide without understanding it, so give me a moment to explain the idea behind it:

    Heads up: the explanation will be a bit technical, but just a little bit.

    After this, we’ll move on to the tag manager settings with screenshots.

    In essence, to report events in Google Analytics 4, you need to do two things:

    1. You have to configure the work environment.
    2. You have to send the Event itself.

    If you look at the analytics codes, you can see that the last line of the script contains the word ‘config’:

    config ga 4

    This basically tells Google Analytics that all of the events that will be sent from this point on will be transferred to account number G-WJ76E1274M, which is my measurement ID according to how it appears here:

    In other words, the ‘config’ configures the work environment, and it can contain various settings such as ‘user_id,’ changes in the cookies settings, or user properties.

    For instance, like this:

    (Ignore for now what exactly is written in the code. I want to demonstrate the overall idea of ‘config’ for you)

    The ‘config’ must be sent to every page where we want to send Google Analytics 4 data, and it must be sent as early as possible, before all events.

    When the ‘config’ is sent, it automatically sends a ‘page_view’ event (unless we’ve configured the settings otherwise).

    After we’ve configured the work environment using ‘config,’ we’ll be able to send events as follows:

    The events will receive the settings we’ve configured in ‘config’ and will be sent to the account number we entered in ‘measurement_ID.’

    In other words, it’s not an “account” but rather a data stream – but I want to simplify things.

    Thus far, we’ve been dealing with theory – now, let’s see how we do it in Tag Manager.

    In the prior post, we explained the differences between GA4 and the good old UA. In this post, we'll learn how to implement GA4 using Tag Manager.

    The first tag: initial Google Analytics configuration and ‘pageview’ set up.

    First, we’ll create the GA4 Configuration type of tag:

    ga4 config

    You can see that I entered my account ID in the Measurement ID (as a variable).

    (Reminder – To get the ID, I go to Data Streams, under Property Settings, select the desired stream, and get the ID from there):

    data streams

    After that, I set a user ID under ‘Fields to Set,’ which ascribes a unique ID to anyone who enters the site when it’s already connected to the system.

    Lastly, I set the ‘firing priority’ to 100, i.e., to the maximum setting.

    Note that under the Measurement ID field, there’s a checkbox for ‘Send a page view,’ which I’ve checked. I’m pointing this out because, in the following tag that I’ll show you, this checkbox won’t be checked.

    The trigger for this tag is ‘All Pages’ because it’s the main setting of my Analytics, which sends a ‘page_view’ each time the page loads.

    The second tag: Setting a ‘user_ID’ for those who’ve identified themselves after entering the site.

    A portion of the site users connect to the site only after entering the site; therefore, when the first tag is sent, it doesn’t include their ‘user_ID.’

    To identify them after they connect, I created an additional tag:

    ga4 tag config

    Do you remember I told you in the beginning that the ‘config’ sends a ‘page_view’ unless we’ve specified otherwise?

    Now you’ll be able to notice that this time I didn’t check the ‘Send a page view’ checkbox because the ‘page_view’ was already sent in the previous tag.

    In ‘Fields to Set,’ I entered the ‘user_ID’ again, and the trigger for this tag is a connection to the system.

    This way, whoever enters the site when connected, is identified via the ‘user_ID’ in the first tag; whoever connects later on, is identified via the ‘user_ID’ in the second tag only.

    Important note: This post’s goal is not to explain the ‘user_ID’ subject in-depth. I just brought up this example to demonstrate how the differences between event tags and ‘config’ play out in the real world.

      Get exclusive CMO tips that I only share with email subscribers.

      The third tag: Viewing Vimeo videos.

      The first two tags were settings tags.

      This time I want to send an event while the user views videos on Vimeo, so I won’t select the GA4 Configuration Tag but rather the GA4 Event.

      You’ll notice that this time there’s no ‘Fields to Set’ field, but instead, an ‘Event Parameters’ field, where I entered the entries that I want to send each time a user either starts or stops a video.

      This is what it looks like in Analytics:

      user id

      And if I want to see a list of all the videos and what percentage of each of them has been viewed, I simply create an Exploration type of report with all the data that I need:

      vimeo

      Conclusion and Action Items

      There are two types of tags in Google Analytics 4 –

      The first one is meant to configure the settings.

      The second one sends the events based on the settings we configured in the first tag.

      Even if you don’t have special settings, create a Configuration Tag with your account ID and set an ‘All Pages’ trigger.

      This alone will start to report the events to your Analytics.

      Afterward, if you’ll want to send more events, create additional GA4 Event-type tags and configure them as you please.

      Good luck.

      Share this article
      Back to top