Stay ahead of the game

Sign up for our newsletter to receive the latest digital marketing strategies and insights for the month ahead, delivered straight to your inbox!

    Verify and Claim Your Website URL in Google Merchant

    E-CommerceMerchant Centers

    These are the steps you need to take in order to verify and claim your website URL in Google Merchant

    Before you can start using certain programs in Google Merchant Center, you need to verify and claim your store’s website URL. Verification lets Google know that you are an authorized owner of a website URL. Claiming your website URL associates the verified website URL with your Google Merchant Center account.

    Step 1: Enter your website URL

    1. Sign in to your Merchant Center account.

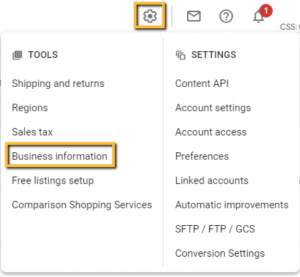
    2. From the settings menu, find Tools 

    3. Select Business information under “Tools.”

    4. Click the Website tab.

    5. Enter the URL for your online store, starting with:

    http:// or https://

    Use a domain that you own and maintain.

    6. Click Save.

    Step 2: Verify your website URL

    To verify your website, you can use one of four methods. Each of these options allows Google to verify that you are the owner and that you have edit access to your website.

    Google Analytics

    If you’re already using Google Analytics and are an administrator of your account, this could be an easy way to verify your website URL. The Google Analytics tracking code is used only to verify your website URL ownership. No Google Analytics data will be accessed.

    1. Ensure that you have set up the Analytics tag. If so, you will find the tag in the head section of your page. Learn how to set up the Analytics tag.

    2. Click the blue Verify URL button at the bottom right to submit your URL to Google Search Console for verification.

    Once you submit your URL, you’ll receive a confirmation email from Google Search Console.

    Before you can start using Merchant Center, you need to verify and claim your store’s website URL. Learn how to do it.

    AI powered feed optimization tool

    Google Tag Manager

    If you’re an account-level administrator for Google Tag Manager, this could be a great way to verify your website URL. The Google Tag Manager container ID is used only to verify website ownership. No Google Tag Manager data will be accessed.

    1. Ensure that you have set up and installed Google Tag Manager. If so you will have the container installation code snippet. If not, follow the instructions to set up and install Tag Manager.

    2. Click the blue Verify URL button at the bottom right to submit your URL to Google Search Console for verification.

    Once you submit your URL, you’ll receive a confirmation email from Google Search Console.

    Access to your server: HTML tag

    If you’re able to edit the HTML code of your site’s index page, you can add a meta tag to your site’s home page to verify your website URL. This code is only a marker and does not give Google access to or permissions for your site. To stay verified, do not remove the HTML tag even after you’ve verified and claimed your website URL.

    1. Copy the custom meta tag generated for your site and paste it into your site’s home page. It should go in the section, before the first section.

    2. Click the blue Verify URL button at the bottom right to submit your URL to Google Search Console for verification.

    Note: If the tag code is not pasted on your site’s home page, you may be taken to the URL redirect path, which leads you to another web page.

    Once you submit your URL, you’ll receive a confirmation email from Google Search Console.

    Access to your server: HTML file upload
    If you’re able to upload new files to your server, you can verify your website URL with an HTML file upload. To stay verified, do not remove the HTML file even after you’ve verified and claimed your website URL.

    1. Click and download the custom HTML file generated.

    2. Upload the file to your website.

    3. Confirm the upload by visiting the site address you see in your HTML file and upload URL verification instructions.

    4. Click the blue Verify URL button at the bottom right to submit your URL to Google Search Console for verification.

    Once you submit your URL, you’ll receive a confirmation email from Google Search Console.

    Step 3: Claim your website URL

    To complete the process, you’ll claim your site. That means you’re reserving the URL you’ve verified for use with your Merchant Center account. Only the user who verifies the website will later be able to claim it.

    Claiming your website URL gives you the exclusive right to use your website in connection with your Merchant Center account. Once your website URL is verified, you can claim it by clicking the blue Claim URL button at the bottom right.

    After claiming your URL, you’ll need to re-fetch your feed. If you use the Content API, you’ll need to re-upload your feed so it can be re-crawled.

    Share this article
    Back to top